Aquarium plants that actually flower are one of those things in this hobby that catch people off guard. most keepers don’t realize it’s possible until it happens in their own tank. I’ve had Anubias send up flower spikes above the waterline and Amazon swords push out blooms from emerged leaves, and it genuinely never gets old. It’s a sign the plant is healthy and conditions are right.
Most of these species flower when grown emersed or when a stem reaches the surface. it’s the plant’s natural reproduction strategy. Here are 11 species that will flower under the right conditions, with honest notes on what it actually takes to get them there.
Key Takeaways
- Many common aquarium plants produce flowers when given some extra care and attention to lighting, water parameters, and nutrient levels.
- Some of the most popular species of live plant can be kept underwater in submersed conditions while others do best above the surface of the water in emersed conditions.
- Many of the flowers produced by flowering aquarium plant species are small and easy to miss but can be an exciting challenge to achieve for the experienced plant keeper.
Introduction to Flowering Aquarium Plants
There are hundreds of different fish species we can keep in our aquariums, but many forget about the dozens of aquatic plants available that keep our systems healthy and beautiful. Live plants help export nutrients in the aquarium, stabilize the substrate, and provide food and shelter for fish and invertebrates. Too few are taking advantage of these benefits!
Many of the species available in the aquarium hobby are undemanding in terms of lighting and carbon dioxide requirements. By meeting their basic needs, happy and healthy aquarium plants will return the favor in color, growth, and even a flower or two.
There is little difference between underwater plants and terrestrial plants. The main difference lies in where the stomata, or pores that facilitate gas exchange are on the leaves of the plant. Terrestrial plants typically have stomata on the underside of their leaves, while aquatic plants have stomata on the top of their leaves; some may lack stomata entirely.
Both terrestrial plants and aquarium plants can be angiosperms, or flowering plants that produce seeds within a fruit. This is in contrast to gymnosperms, like conifers, that have exposed seeds. As of now, there are no known underwater flowering plants that are gymnosperms.
Can Flowers Grow In A Fish Tank?
Yes! If your plant is an angiosperm, then it has the ability to produce a flower. However, flowers can be difficult to produce in the aquarium setting and greatly vary in appearance; even if you experience your aquarium plants flowering, there’s a chance you might miss them due to them being so small and sudden.
The truth is that flowering aquarium plants don’t produce the most magnificent flowers ever. The most apparent flowers are usually those of water lilies and lily pads. Even then, flowers are short-lasting and easy to miss.
Many aquarium plants grow white, off-white, or pink flowers. These are often very small, forming around the tip of a singular stem. Some species grow best fully emersed or out of the water, while others will bloom while underwater. Some may reach toward the water’s surface, so only their flowers are dry while the rest of the plant stays submerged.
While keeping flowering plants is easy, getting them to bloom can be challenging. No matter how perfect your fish tank might test, there is a chance that your flower never blooms. There are a few ways to increase the odds of your aquarium plants blooming:
1. Keeping stable and ideal planted tank parameters. Some live plants can be sensitive, but some live plants that are in the process of blooming can be even more sensitive. While terrestrial plants rely on other insects and wind to pollinate, plants need good water parameters and ideal water conditions to germinate; many aquarium plants reproduce via rhizomes where new plants stem from the main plant and create clones.
Creating flowers and reproducing takes a lot of energy. Plants need to ensure that conditions are favorable for success. This means stable water parameters with available light and nutrients. A healthy plant will transfer its energy from the growing process into the flowering process, resulting in reproduction through tiny flowers. In some cases, dosing dry or liquid fertilizer and injecting carbon dioxide might be necessary to create ideal conditions.

Use Offer Code ASD10%Off
The highest end offering by CO2Art. This package includes everything you need to perform consistent and the highest quality CO2 injection in the industry!
2. Pruning. Many flowering aquarium plants grow too tall or too wide to our liking. In response, hobbyists trim their plants so that they fit the aquascape or don’t suffocate other species. In the wild, plants compete with each other for space, light, nutrients, and other resources. Once successful, they begin to flower so that this competition may continue.
In the aquarium, these conditions should be replicated and the plant should be left to grow freely. At the same time, pruning can actually influence some species to germinate. This is because the resources that would have been attributed to new leaves now go into forming new flowers. However, this does not work all the time and pruning can lead to exponential leaf growth instead.
Which Aquatic Plants Can Grow Out Of Water?
Apart from aquariums that feature tropical plants and fish, many hobbyists set up semi-aquatic systems in paludariums or entirely terrestrial biomes. These different setups have become increasingly popular over the past few years and are a great alternative for people looking to bring nature into their homes without the worry of caring for fish.
Luckily, many flowering aquarium plants can grow in semi-aquatic or terrestrial setups as long as humidity requirements are met.
Here are some of the best flowering aquarium plants for a semi-aquatic setup:
- Anubias spp.
- Bucephalandra spp.
- Aponogeton spp.
- Red tiger lotus (Nymphaea zenkeri)
- Giant hygro (Hygrophila corymbosa)
Here are some of the most popular terrestrial plants available:
- Echinodorus muricatus
- Labisia spp.
- Ardisia spp.
Keep in mind that terrestrial plants can drown if they’re placed fully underwater. Many of the plant species listed as terrestrial live in wet and humid conditions where the soil is constantly damp. This is best recreated in a closed paludarium or terrarium where moisture cannot easily escape.
The 11 Best Tank Plants That Blossom
Not many hobbyists are aware that the plants they buy are actually flowering plant species.
The simple fact is that it is rare to ever witness a freshwater live plant flowering. Instead, hobbyists heavily rely on the shapes and colors of their leaves for design and aquascaping purposes. But if you’re looking for a challenge above keeping a heavily planted aquarium, getting your flowering plant to bloom might be your next big accomplishment.
Here are some of the best and most popular flowering aquarium plants readily available at local fish stores and online!
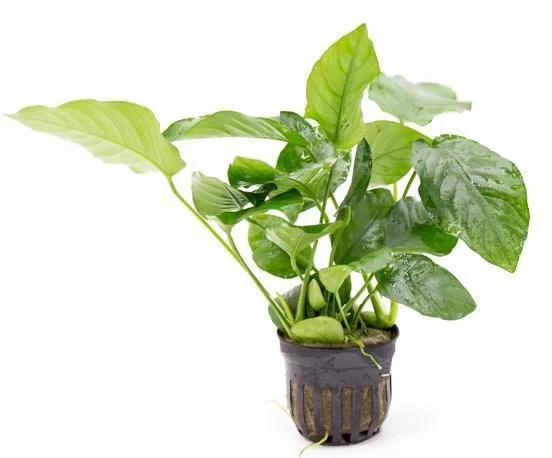
1. Anubias barteri
Best Value
A forgiving low light aquarium plant that will not be eaten by most fish
- Scientific Name: Anubias barteri
- Skill Level: Easy
- Size: 4-6 inches
- Lighting: Low to moderate
- pH: 6.0-8.0
- Growth Rate: Slow to moderate
- CO2 Requirement: Not required
Anubias barteri, known by its scientific name or as a general species of Anubias, is one of the most popular species of Anubias available to freshwater enthusiasts. While many hobbyists use these underwater plants as a submersed foreground plant or as coverage for decorations, these plants can also be grown–and actually grow better–out of the water.
Anubias members are very hardy plant species. They do not require additional carbon dioxide and can thrive in low light settings. Anubias barteri is one of the smaller species available from this genus, and have broad, dark green leaves attached to a center rhizome. Unlike most other freshwater plants, Anubias plants grow best when their rhizome is uncovered and attached to a hard surface. This can be done with glue or fishing line.
Does Anubias Blossom Underwater?
Yes, Anubias plants produce a noticeable flower with an extra long flower stalk from the center of the rhizome. The actual flower emerges from a small cupped leaf and has a yellow-white scaly appearance.
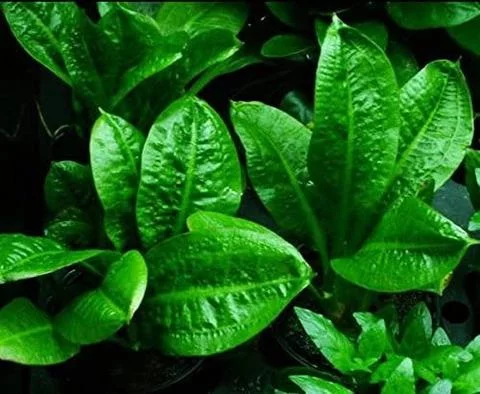
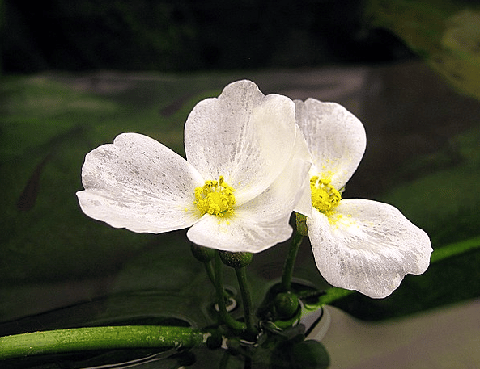
2. Echinodorus muricatus
With its short stems and long, bright green leaves, this plant is sure to add some beautiful coverage to your background or mid-ground area.
- Scientific Name: Echinodorus muricatus
- Skill Level: Easy
- Size: 12-20 inches
- Lighting: Moderate to high
- pH: 6.0-8.0
- Growth Rate: Fast
- CO2 Requirement: Not required
Echinodorus muricatus is a fast-growing freshwater plant. It is not the most common species of Echinodorus to find due to the popularity of its close relative, the Amazon sword (Echinodorus grisebachii/Echinodorus amazonicus). Echinodorus muricatus is also commonly confused with Echinodorus cordifolius.
Both these species of Echinodorus are regularly referred to as the radican sword plant.
Echinodorus muricatus is used as a midground or background plant. It has long stems attached to skinny, oval leaves. These leaves are light green with prominent veins. They are relatively hardy and don’t require carbon dioxide dosing, but will grow fastest under moderate to high lighting. They are heavy root feeders and need a good supply of nutrients available in the aquarium substrate; many hobbyists find success through the use of root tab fertilizers.
The radican sword plant can grow emersed and is most likely to produce flowers when done so. These flowers grow along a long stem in clusters of three. The flowers are white with yellow centers and are moderately sized.
3. Ardisia

Ardisia plants are known for their ability to thrive in a wide range of climates and environments. They can be found in tropical, subtropical, and temperate regions around the world.
- Scientific Name: Ardisia spp.
- Skill Level: Easy
- Size: <10 inches
- Lighting: Partial shade
- pH: N/A
- Growth Rate: Slow
- CO2 Requirement: N/A
Ardisia species are normally regarded as an uncommon houseplant, but they’re slowly making their way into the terrarium and aquarium keeping hobby as well. There are over 500 species of Ardisia available, but only a few species are familiar to aquatic hobbyists:
- Ardisia dino
- Ardisia silver
- Ardisia blue
- Other tricolor and pink line varieties
These flowering plants greatly vary between species. Some species, like Ardisia dino, have circular broad leaves with many ruffles and a reddish-brown stem. Other species, like Ardisia silver and Ardisia blue, are named after the respective hints of color in their skinny and tapered leaves.
Ardisia does best when grown in constantly moist soil with bright yet indirect moderate lighting. When happy, these plants produce small white flowers that may turn into red berries.
4. Hydrocotyle verticillata

A versatile, easy-to-grow plant that can add a splash of green to your aquarium. Also known as whorled pennywort.
- Scientific Name: Hydrocotyle verticillata
- Skill Level: Easy to moderate
- Size: 5-20 inches
- Lighting: Moderate to high
- pH: 6.0-8.0
- Growth Rate: Fast
- CO2 Requirement: Recommended
Hydrocotyle verticillata goes by a few names, including whorled pennywort, whorled marshpennywort, and shield pennywort. Hydrocotyle is some of the most recognizable semi-aquatic plants in the botany world and make perfect foreground, midground, or background additions to the freshwater aquarium.
This aquatic plant has large half-dollar leaves that grow upwards along a singular stem. Together, these stems make a very bushy appearance that can become overwhelming if left uncontrolled. Providing higher light and carbon dioxide can help keep growth compact, but the plant will still need to be regularly trimmed.
Whorled pennywort grows best when its leaves are allowed to grow emersed. This flowering plant has small, delicate white flowers that emerge from the top of a long stem. They open to create a radial cluster at the top.
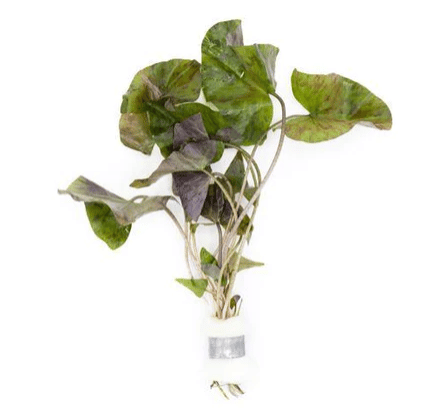
5. Anubias Glabra

The Anubias Barteri Glabra is a beautiful and hardy plant that is perfect for any aquarium. This plant is known for its narrow, wavy leaves and vibrant green color.
- Scientific Name: Anubias glabra
- Skill Level: Easy
- Size: 8-16 inches
- Lighting: Low to moderate
- pH: 6.0-8.0
- Growth Rate: Slow
- CO2 Requirement: Not required
Another species of Anubias, Anubias glabra is much larger than Anubias barteri and is best used as a midground plant species. These flowering plants come in many variations but have thick stems that give way to individual, long, narrow, and tapered leaves.
This aquatic plant has the same requirements as most species of Anubias, and will thrive under low light and with minimal nutrients. Again, Anubias glabra will grow best when left to grow out of the water and has the possibility to produce small and scaly whitish-yellow flowers.
6. Bucephalandra

Bucephalandra is a slow-growing plant that’s perfect for anyone looking to grow their first aquatic plant. They are great for attaching to hardscape
- Scientific Name: Bucephalandra spp.
- Skill Level: Moderate
- Size: <10 inches
- Lighting: Low to moderate
- pH: 6.0-8.0
- Growth Rate: Slow
- CO2 Requirement: Recommended
Members of the Bucephalandra genus are a relatively new addition to the freshwater planted tank hobby. These aquatic plants are regularly added to the submersed aquarium but are especially popular among paludarium and terrarium keepers.
Bucephalandra are very slow growing but offer thick, blue, red, and dark green foliage that can’t be achieved with other species. These flowering aquarium plants can be difficult to transition between emersed and submersed conditions, so it’s best to buy it growing in the way that it will be used.
The flowers of Bucephalandra are very similar to those of Anubias. These flowers have a scaly white or pink stalk in the middle of a white or pink veil of petals. This flower emerges from a long, oftentimes lighter-colored stem.
7. Labisia

Labisia Musim is a flowering aquarium plant that is relatively rare to find available in pet stores. However, they are commonly sold online.
- Scientific Name: Labisia spp.
- Skill Level: Moderate
- Size: 8-10 inches
- Lighting: Partial shade
- pH: N/A
- Growth Rate: Slow
- CO2 Requirement: N/A
- Humidity: 70%
These flowering aquarium plants are relatively rare to find available in pet stores but are commonly sold online on general houseplant sites. Labisia are unique terrestrial plants that thrive in humid conditions, making them a perfect addition to a paludarium or terrarium setup. Submerging these plants will kill them.
Labisia have thick leaves, oftentimes with apparent venation patterning with alternating light and dark green. One of the most unique species of this aquatic plant is Labisia sp. ‘Turtle Back’, which has the most apparent venation.
Little is known about these plants. They produce flowers that can either be white or purple along the length of the stem. If left to bloom until the end, these flowers will turn into red berries.
8. Aponogeton
- Scientific Name: Aponogeton spp.
- Skill Level: Easy to advanced
- Size: <20 inches
- Lighting: Low to high
- pH: 6.0-7.5
- Growth Rate: Moderate
- CO2 Requirement: Recommended
The Aponogeton genus has some of the most interesting-looking species of flowering aquarium plants due to their waves and ruffles (video source). One of the most notable species is Aponogeton madagascariensis, commonly known as the Madagascar lace plant. While relatively new to the hobby, other popular species of Aponogeton include:
- Aponogeton boivinianus
- Aponogeton longiplumulosus
- Aponogeton ulvaceus
These plants range in color from dark green to light green. They are most identifiable by their ruffled-leaf appearance, which can bring a lot of texture to the midground or background of the aquarium. Each species of Aponogeton has different care requirements fit for hobbyists of different experience levels.
While species of the Aponogeton genus prefer to be planted under the water, their flowers do not. These are underwater flowering plants and will not grow emersed. While the leaves won’t grow out of the water, the flowers float at the water’s surface. These flowers can be white, pink, or purple and have an octopus-like appearance. Four stems reach out of the water, covered in frilly, small purple flowers.
These flowering aquarium plants are more demanding than some of the others on this list and require good water flow, moderate to high lighting, a nutrient-rich substrate, and carbon dioxide dosing. Good maintenance and stable water parameters will lead to large, bright green leaves and flowers. Unlike most other aquatic plants, this is a bulb plant.
Sadly, the Madagascar lace plant is endangered in the wild.
10. Red Tiger Lotus
The Nymphaea Tiger Lotus is a beautiful flowering plant perfect for any aquarium. This plant is easy to care for and will thrive in most aquariums.
- Scientific Name: Nymphaea zenkeri
- Skill Level: Easy
- Size: 4-6 inches
- Lighting: Moderate
- pH: 6.0-7.5
- Growth Rate: Moderate
- CO2 Requirement: Not required
No pond is complete without lily pads. The red tiger lotus is a beautiful addition to the home aquarium or the pond setup.
These pond plants bring a burst of color to both the water column and the surface of the water. Their leaves turn brownish-red while reaching for the surface where they turn into large lily pad-like leaves. Eventually, they give way to a beautiful flower during late spring and early summer. These flowers can be white or purple. They have many thin petals that radiate from the bright yellow center.
While the red tiger lotus grows tall outdoors, many aquarium hobbyists also successfully keep them indoors. Even in the aquarium, these flowering plants will reach the surface of the water and bloom if left untrimmed.
11. Giant Hygro
- Scientific Name: Hygrophila corymbosa
- Skill Level: Easy
- Size: <24 inches
- Lighting: Moderate
- pH: 6.0-7.5
- Growth Rate: Fast
- CO2 Requirement: Not required
As its common name suggests, the giant hydro (video source) is a large flowering plant that can quickly fill up the backdrop of freshwater fish tanks. This plant is also known as the temple plant or starhorn plant.
There are several variations of giant hygro, including a red variety and a compact variety. This species can grow up to 2 feet tall under moderate lighting without carbon dioxide, but can easily be maintained at smaller sizes through pruning. If overgrowth is a potential problem, then choosing the compact variety might be better for your personal system as this is a very fast growing plant.
The giant hygro has a simple yet effective appearance. This flowering plant has long and skinny bright green leaves that radiate from the center, leaving the stems buried under foliage. The colors of the leaves may vary and contain red depending on the variety.
This flowering plant doesn’t bloom often but has some of the most beautiful, tiny flowers. Due to the massive natural size of the plant, giant hygro flowers prefer to bloom above water. They produce small purple flowers that have some fragrance.
Final Thoughts
Many hobbyists keep popular flowering aquarium plants without even knowing it! Some of the species on this list are very common plants that can be found in most aquarium setups but aren’t given a chance to bloom. By providing stable water parameters, plenty of nutrients, adequate lighting, and careful pruning, there is a chance that your mundane aquarium plant might just flower!
🌿 Want to learn more? This article is part of our complete Planted Tank & Aquascaping Guide. your ultimate resource for aquarium plants, aquascaping styles, substrates, and more.
References
- Seriously Fish — Species profiles and care data
- FishBase — Taxonomy and scientific data
- Practical Fishkeeping — Husbandry and care advice


 Dwarf Gourami in Aquarium” class=”wp-image-549383″/>


 Altum Angelfish in Planted Tank” class=”wp-image-551860″/>

 Ember Tetra in Planted Tank” class=”wp-image-547471″/>

 Boesemani Rainbowfish” class=”wp-image-1061409″/>