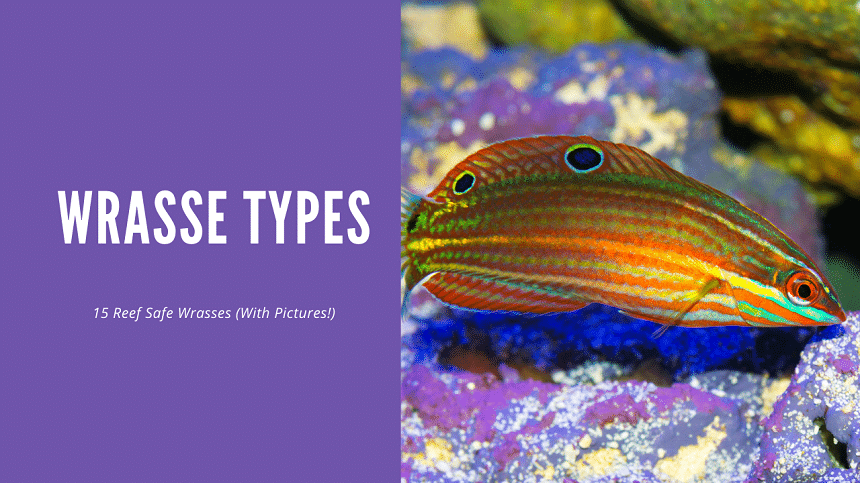
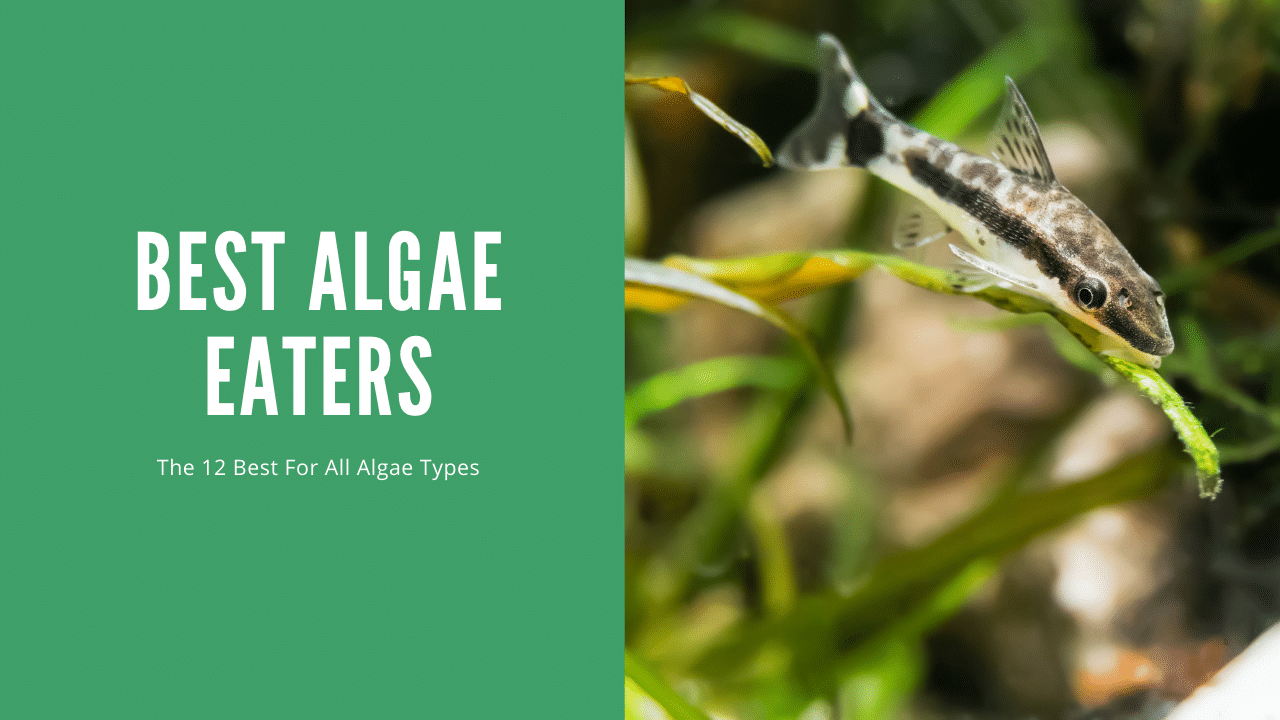
Wrasses are the most diverse family of saltwater fish you will encounter. Some are peaceful reef cleaners. Some are aggressive predators. Some bury in sand. Some jump out of tanks.
The word wrasse covers peaceful cleaners and aggressive predators. Know the species before you buy.
The word wrasse covers peaceful cleaners and aggressive predators. Know the species before you buy.
Table of Contents
- What Most Care Guides Get Wrong About 15 Reef-Safe Wrasse Types for Saltwater Aquariums
- Introduction To Wrasses
- Classification
- Requirements And Temperament
- Types
- The Best 15 For Saltwater Tanks
- Other Types (To Avoid)
- Frequently Asked Questions
- Is the 15 Reef-Safe Wrasse Types for Saltwater Aquariums Right for You?
- How the 15 Reef-Safe Wrasse Types for Saltwater Aquariums Compares to Similar Species
- Final Thoughts
Wrasses are one of the largest and most diverse fish families in the ocean. And among the most popular choices for reef aquariums. After running a 125-gallon reef tank and following the saltwater side of this hobby for over 25 years, I’ve developed strong opinions on which wrasses belong in a reef and which don’t. The reef-safe question is genuinely nuanced with wrasses: some species will eat the shrimp and snails you’re trying to keep, others are fine with invertebrates but will actively hunt flatworms and bristle worms. Some need a deep sand bed to sleep in at night. Most are persistent jumpers that require a tight lid. This guide focuses on 15 reef-safe wrasse types I’d personally recommend, with honest context on what “reef safe” actually means for each species.
What Most Care Guides Get Wrong About 15 Reef-Safe Wrasse Types for Saltwater Aquariums
The biggest mistake I see with 15 reef-safe wrasse types for saltwater aquariumss is underestimating their aggression. Guides will label them “semi-aggressive” and move on. In practice, that label doesn’t tell you much. Tank layout, stocking density, and territory management all play a huge role in whether these fish coexist or constantly fight. Tank size is another area where most guides get it wrong. The minimum listed on most care sheets is exactly that, a minimum. For long-term success, especially if you’re keeping a group, I always recommend going at least one size up from whatever the guide suggests. Finally, diet gets oversimplified. Pellets alone won’t cut it. In my 25+ years keeping fish, I’ve found that variety in diet directly affects color, growth, and overall vitality. Include frozen foods, quality pellets, and occasional vegetable matter for the best results.
Introduction To Wrasses
Wrasses is found throughout the Atlantic, Indian, and Pacific Oceans, though most available species come from the coral reefs of the Indo-Pacific. For the most part, wrasse fish inhabit coral reef ecosystems, though the exact type of reef will depend on latitude.
Some of these wrasses are completely reef safe, while others is partially reef-safe or not reef-safe at all. For the purposes of this article, we will only be looking at those wrasse species that are completely and partially reef-safe.
Are All of Them Born Female?
Most wrasses are protogynous hermaphrodites. This means that the majority of these fish are born as females and later have the ability to turn into males in response to environmental conditions or internal changes.
This ability helps these fish when stresses, like limited mates or resources, impact the ability to reproduce. Because conditions are stable in the aquarium, there is little need for fish to change sexes.
Classification
| Order | Perciformes |
| Family | Labridae |
| Common Name | Wrasses |
| Species Count | Over 600 species across 82 genera |
Requirements And Temperament
Since there are so many species of wrasse available in the marine aquarium hobby, setting a generalization for care is not possible. Species, like the pygmy wrasse (Wetmorella nigropinnata), do well in nano tanks under 20 gallons while other larger and more active wrasse need much larger setups.
There is one general care requirement for these fish though, and that is that they need a decently deep sandbed. This is because most wrasses sleep in the sandbed; they will also use the sandbed to hide when stressed, which causes a lot of mysterious disappearances for hobbyists.
In addition to sleeping in the sand bed, some wrasses will excrete a mucus cocoon to sleep in. If they are visible in the tank at night, you may notice them perched in between or underneath the rocks in a trance-like state. As soon as the lights turn on, you may see some remnants of the cocoon sloughing off.
Are They Aggressive?
In general, wrasses are community fish. Some species are shyer than others, but they aren’t known for becoming the bully of the tank. Though some species from the Pseudocheilinus genus, like six-line wrasses, have been known to become especially problematic.
Of course, this is entirely dependent on the individual personality of the wrasse.
Are They Hard To Keep?
Wrasses are active fish that will constantly search for food in and out of the rocks. Some wrasse species have specific dietary needs, like live copepods and various frozen foods. This can make feeding some of the more advanced wrasses more challenging.
Wrasses can also be difficult to safely acclimate to a new tank, but they are hardy once established. These marine fish are notorious for carrying external and internal parasites, like flukes. Because of this, it is strongly recommended to quarantine them for several weeks before adding them to the main display.
It is also required to have a tight lid on the aquarium as these fish are master escape artists.
Types
More likely than not, you will want to add at least one wrasse to your aquarium. The problem is that some wrasse types need certain setups or diets and success will depend on the skill level of the keeper.
Here are the most common genera of wrasse to find in the aquarium hobby:
- Anampses
- Cirrhilabrus
- Halichoeres
- Labroides
- Macropharyngodon
- Paracheilnus
- Pseudocheilinus
- Pseudojuloides
- Wetmorella
Not all of these wrasses are entirely reef-safe, though. Some wrasses might leave corals alone but nibble at shrimp and other reef crustaceans instead.
The Best 15 For Saltwater Tanks
To help differentiate between the best 15 wrasses for saltwater tanks, we have created categories for fully reef-safe wrasses and partially reef-safe wrasses. Check out the video below from our YouTube Channel. If you like our channel, be sure to subscribe. We post videos every week.
Fully reef-safe wrasses is kept with corals and all invertebrates. Partially reef-safe wrasses is kept with corals but should be watched when kept with other invertebrates.
Fully Reef Safe
For the most part, the wrasse species listed in this group will not pick at corals or invertebrates. However, there is always the chance that your specific fish picks at them in your own aquarium.
1. Blue Striped Tamarin (Anampses femininus)
- Species Type: Anampses
- Scientific Name: Anampses femininus
- Size: 10 inches
- Origin: Pacific Ocean
- Tank Size: 120 gallons
- Available As Tank Bred: Not available
One of the most expensive and challenging wrasse species, the blue striped tamarin is unmatched. These large fish turn from yellow to royal blue as you move from their head to their tail. All along the body, they have even more electric blue horizontal stripes, earning them their name.
Blue striped tamarins are collected from very exact locations throughout the Melanesia region of the Pacific Ocean. There, they feed on coral reefs in small groups. In the aquarium, they are entirely reef safe.
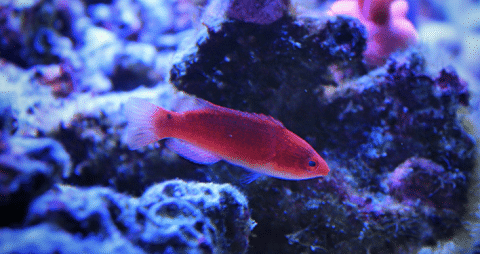
2. Flame (Cirrhilabrus jordani)
- Species Type: Cirrhilabrus
- Scientific Name: Cirrhilabrus jordani
- Size: 4 inches
- Origin: Eastern Pacific Ocean
- Tank Size: 90 gallons
- Available As Tank Bred: Rare
The flame wrasse, also known as Jordan’s fairy wrasse, is a stunning red and yellow colored fish with extended feathery fins. These fish come from the tropical waters surrounding the Hawaiin islands, feeding on zooplankton and other invertebrates in the water column (Video Source).
Though their dietary needs are more specific than other wrasses, they are compatible with both corals and invertebrates.
3. Scott’s Fairy (Cirrhilabrus scottorum)
- Species Type: Cirrhilabrus
- Scientific Name: Cirrhilabrus scottorum
- Size: 6 inches
- Origin: Pacific Ocean
- Tank Size: 90 gallons
- Available As Tank Bred: Not available
Scott’s fairy wrasse is a whirlwind of vibrant colors. Though the variation of color changes based on where they originated from (most commonly Australia, Tonga, and Fiji), they have a silky green body that transitions into blue and red. The caudal fin is red and the dorsal fin may with yellow with a darker margin.
In the wild, these wrasses are mostly found on the outskirts of the reef which means that your fish might enjoy having some extra swimming space. Luckily, they are completely coral and invertebrate safe.
4. Red-Headed Solon Fairy (Cirrhilabrus solorensis)
- Species Type: Cirrhilabrus
- Scientific Name: Cirrhilabrus solorensis
- Size: 5 inches
- Origin: Eastern Indian Ocean
- Tank Size: 90 gallons
- Available As Tank Bred: Not available
The red-headed solon fairy wrasse is aptly named after its orangey-red head at the tip of its light blue with cream underbelly body. This Indonesian species is sometimes compared to the blueside wrasse (Cirrhilabrus cyanopleura) due to similarities in appearance, though they are two separate species (Video Source).
These wrasses are found in slightly deeper waters and will not pick at corals or invertebrates.
5. Yellow Banded Possum (Wetmorella nigropinnata)
- Species Type: Wetmorella
- Scientific Name: Wetmorella nigropinnata
- Size: 3 inches
- Origin: Indo-Pacific Ocean
- Tank Size: 15 gallons
- Available As Tank Bred: Not available
On paper, the yellow banded possum wrasse is a perfect species for nano tanks: they are smaller fish and not as active as other larger wrasses. However, they are extremely sensitive to changes in parameters and have a pretty exact diet. These fish feed heavily on live copepods, though most individuals can thrive with a selection of frozen foods.
This wrasse species is named after the bands at the front of their head and at the base of their tail against their red body. Yellow banded possums are described as cryptic and finicky as they are often hiding in the rocks or cruising for food.
These wrasses are completely reef-safe and will not eat invertebrates due to their small mouth.
6. McCosker’s Flasher (Paracheilinus mccoskeri)
- Species Type: Paracheilinus
- Scientific Name: Paracheilinus mccoskeri
- Size: 3 inches
- Origin: Indo-West Pacific Ocean
- Tank Size: 55 gallons
- Available As Tank Bred: Uncommon
McCosker’s flasher wrasse is a beautiful fish with an orange and red body and electric blue highlights. These fish are very hardy and active but will stay towards the bottom portions of the aquarium. McCosker’s wrasses are also very likely to take well to other wrasses, especially multiple females, making this species one of the more popular to breed.
For the most part, these fish will leave both corals and small invertebrates alone. There is always the chance that they’ll eat any worms or snails that they find, though!
7. Carpenter’s (Paracheilinus carpenteri)
- Species Type: Paracheilinus
- Scientific Name: Paracheilinus carpenteri
- Size: 3 inches
- Origin: Western Pacific Ocean
- Tank Size: 55 gallons
- Available As Tank Bred: Not available
Carpenter’s wrasses are an extremely popular type of wrasse, largely due to their bright red and yellow colors. These fish do even better when kept in group settings, which can add tons of color and movement to the aquarium. It is strongly recommended to add females first and then a single male.
These wrasses are pretty good citizens of the tank and won’t pick at corals or invertebrates. As always, there is a chance that your individual Carpenter’s wrasse will pick, though.
8. Filamented Flasher (Paracheilinus filamentosus)
- Species Type: Paracheilinus
- Scientific Name: Paracheilinus filamentosus
- Size: 4 inches
- Origin: Indo-Pacific Ocean
- Tank Size: 55 gallons
- Available As Tank Bred: Not available
These fish are similar in color to Carpenter’s wrasses but are more uniform red. The filamented flasher wrasse, also known as the whip-fin fairy wrasse, also does well with a group of females but the order of addition is less important. Filamented flasher wrasses rarely pick at corals and invertebrates, so they is kept in most setups!
Interestingly, these fish have been known to hybridize with other species in the wild so it is recommended to not keep closely related species within the same tank.
Partially Reef-Safe
Wrasse species within this group should be expected to pick at smaller invertebrates and possibly even corals. There is the chance that they will behave in your tank, but caution is needed.
9. Yellow Coris (Halichoeres chrysus)
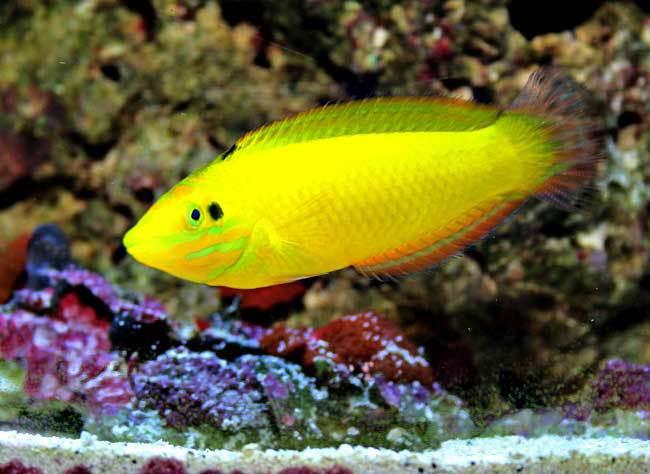
- Species Type: Halichoeres
- Scientific Name: Halichoeres chrysus
- Size: 5 inches
- Origin: Eastern Indian Ocean
- Tank Size: 50 gallons
- Available As Tank Bred: Rare
The yellow coris wrasse, also known as the golden rainbowfish or canary wrasse, is a very popular fish due to its vibrant, uniform yellow coloration. This yellow wrasse is relatively hardy and prefers to be in communities with other wrasse.
Yellow coris wrasses will happily eat various worms, coral pests, and snails they find around coral reefs. Though they will keep corals untouched, they cannot differentiate between good and bad smaller invertebrates. This makes them partially reef-safe.
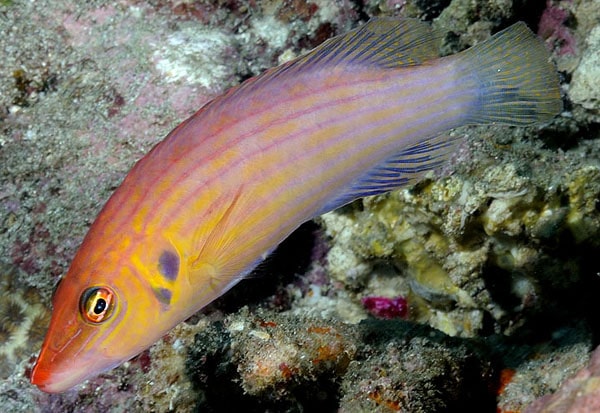
10. Melanurus (Halichoeres melanurus)
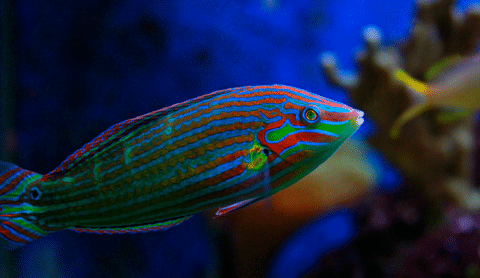
- Species Type: Halichoeres
- Scientific Name: Halichoeres melanurus
- Size: 5 inches
- Origin: Indo-Pacific Ocean
- Tank Size: 50 gallons
- Available As Tank Bred: Uncommon
The melanurus wrasse goes by a few names including Hoeven’s wrasse and tail-spot wrasse. These fish have all colors of the rainbow with horizontal blue stripes along their yellow-blue body.
This wrasse species is found around shallow reefs near Australia, Fiji, and Indonesia. There, they feed on small invertebrates among corals; in the aquarium, they leave corals alone but should not be trusted with smaller worms and snails.
11. Christmas (Halichoeres claudia)
- Species Type: Halichoeres
- Scientific Name: Halichoeres claudia
- Size: 5 inches
- Origin: Pacific Ocean
- Tank Size: 50 gallons
- Available As Tank Bred: Not available
These festive fish from Fiji are named after their red and green color variations! Christmas wrasses, also called Claudia’s wrasse, are an easy and colorful wrasse species to add to the reef aquarium. They are also one of the more inexpensive species available.
However, Christmas wrasses are likely to eat smaller invertebrates like the rest of the Halichoeres species on this list.
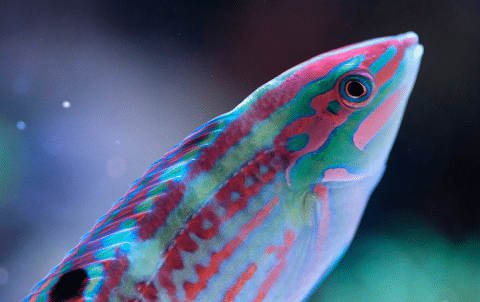
12. Red-Line (Halichoeres biocellatus)
- Species Type: Halichoeres
- Scientific Name: Halichoeres biocellatus
- Size: 4 inches
- Origin: Western Pacific Ocean
- Tank Size: 50 gallons
- Available As Tank Bred: Not available
The red-line wrasse is similar to the Christmas wrasse in color and size. However, these fish have a much darker base green color and burnt orange patterns instead of red; they are also slightly smaller and originate from more western waters around the Philippines and Japan.
These fish are found around the perimeters on the reef, in more open water. This means that they will prefer having some extra swimming area.
Though the red-line wrasse won’t eat corals, they will definitely pick at invertebrates they find in between the rocks.
13. Six-Line (Pseudocheilinus hexataenia)
- Species Type: Pseudocheilinus
- Scientific Name: Pseudocheilinus hexataenia
- Size: 3 inches
- Origin: Indo-Pacific Ocean
- Tank Size: 55 gallons
- Available As Tank Bred: Rare
The six-line wrasse is probably one of the most well-known species of wrasse in the aquarium hobby due to its size, activity levels, and attractive appearance.
For a long time, however, these small fish were categorized as a nano species. Though they might look like they would fit perfectly into a small display, their demanding activity levels leave them needing a large tank with open swimming space and intricate rockwork.
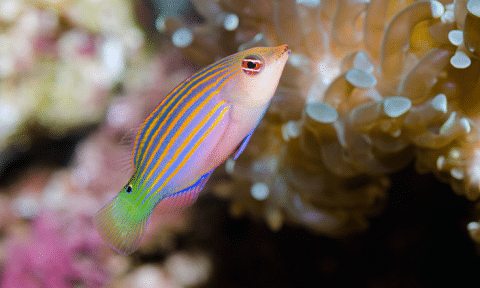
Six-line wrasses are a bluish-purple color with six horizontal orange stripes that lead into their green tail fin. Though small, these fish are very active and can show aggression towards other wrasses. Because they are so small, there is less of a chance for them to eat any larger invertebrates in your tank, though they do favor copepods and bristleworms.
14. Eight-Line (Pseudocheilinus octotaenia)
- Species Type: Pseudocheilinus
- Scientific Name: Pseudocheilinus octotaenia
- Size: 5 inches
- Origin: Indo-Pacific Ocean
- Tank Size: 55 gallons
- Available As Tank Bred: Rare
The eight-line wrasse is different from the six-line wrasse in terms of size and appearance. However, their temperaments is just as aggressive as their smaller counterparts.
The eight-line wrasse is slightly less popular due to its paler yellow and pink colorations and larger size. This difference of 2 inches also allows the eight-line wrasse to eat more invertebrates than the six-line, leaving urchins, snails, and bigger worms at risk.
15. Small Tail Pencil (Pseudojuloides cerasinus)

- Species Type: Pseudocheilinus
- Scientific Name: Pseudojuloides cerasinus
- Size: 5 inches
- Origin: Eastern Pacific Ocean
- Tank Size: 75 gallons
- Available As Tank Bred: Not available
Small tail pencil wrasses are pretty rare to come by in the aquarium hobby (picture source). They’re a recent addition and not all of their behaviors and personalities are fully understood. Based on how other species within this genus interact with the reef, it is safe to assume that they are only partially reef-safe.
This wrasse species is named after its narrow body which ends in a proportionally small caudal fin. Otherwise, they have pretty basic red colors with a signature yellow eye. They are only found in the tropical waters around Hawaii but form a complex with other species in the Pseudocheilinus genus.
Other Types (To Avoid)
There are a few wrasses for sale that you will see at the local fish store that are very popular, but should be avoided for reefs. Here are a few below:
1. Bird
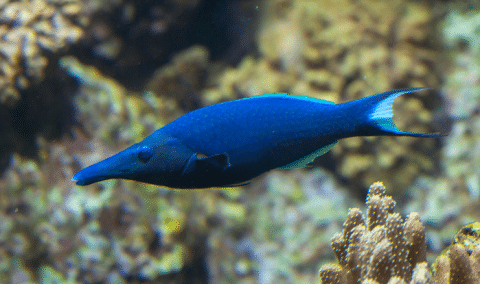
- Species Type: Gomphosus
- Scientific Name: Gomphosus varius
- Size: 11 inches
- Origin: Fiji
- Tank Size: 125 gallons
- Available As Tank Bred: Not available
The bird wrasse is a beautiful and active wrasse fish that unfortunately gets large. It is not reef safe as it will happy consume any inverts it can grab and will also eat any fish that it can fit in its mouth. These are best for fish only for fish only with live rock systems. The bird wrasse is a hardy fish, just not appropriate for a reef tank. They are one of the few wrasses you can successfully pair.
2. Dragon
- Species Type: Novaculichthys
- Scientific Name: Novaculichthys taeniourus
- Size: 12 inches
- Origin: Fiji
- Tank Size: 180 gallons
- Available As Tank Bred: Not available
A Dragon wrasse is an amazing fish to find at a local fish store. You see them in their juvenile form, which has a unique mohawk like fin on its head. They are cute, very active, and full of personality. Unfortunately they grow to foot long and will tear apart any invert in your aquarium. They are also disruptive to corals as they will move them and arrange rocks in the tank.
They also are one of the less hardy Wrasses you can purchase. Overall, a wrasse you should avoid unless you want to place them in a fish only or fish only with live rock system.
3. Leopard

- Species Type: Macropharyngodon
- Scientific Name: Macropharyngodon meleagris
- Size: 6 inches
- Origin: Fiji
- Tank Size: 90 gallons
- Available As Tank Bred: Not available
The Leopard Wrasse is a beautiful fish that actually is reef safe, however, they do poorly in captivity. They are notoriously difficult to successfully establish in an aquarium. Many tend to die because they do not accumulate well to fish food. They also tend to get shipped with damaged mouths, which leads to their deaths.
Leave these Wrasses to the experts or in the ocean.
Frequently Asked Questions
What is the most reef-safe wrasse?
The Fairy Wrasses (Cirrhilabrus species) are widely considered the most reef-safe wrasses. They are peaceful, colorful, and completely ignore corals and invertebrates. Popular choices include the Carpenter Fairy Wrasse and the McCosker Flasher Wrasse.
Do wrasses jump out of the tank?
Yes, wrasses are notorious jumpers. A tight-fitting lid or mesh screen over the top of the tank is essential. Many experienced reefers have lost wrasses to jumping, especially during the first few days after introduction when they are stressed and exploring their new environment.
How big do reef-safe wrasses get?
Most reef-safe wrasses stay between 3 to 6 inches in length. Fairy wrasses and flasher wrasses are on the smaller end at 3 to 4 inches, while melanurus wrasses and leopard wrasses can reach 5 to 6 inches. Always research the adult size of the specific species before purchasing.
Can you keep multiple wrasses together?
Yes, you can keep multiple wrasse species together in a sufficiently large tank, 75 gallons or more. Avoid keeping two of the same species unless they are a mated pair. Mixing different genera, such as a fairy wrasse with a flasher wrasse, works well.
Do wrasses eat pests?
Many wrasses are excellent pest control fish. Six Line Wrasses eat flatworms and pyramidellid snails. Melanurus Wrasses consume bristle worms, flatworms, and small snails. Leopard Wrasses eat parasitic pyramid snails. They are among the best natural pest controllers in a reef tank.
Expert Take
Wrasses are one of the most useful families in a reef tank: active, pest-controlling, and visually dynamic. But many species become aggressive once established. The stocking order matters. Add your wrasse last and you will have far fewer problems than the keeper who added it second. — Mark Valderrama, AquariumStoreDepot
ASD Difficulty Rating: Tier 2 – Intermediate. Wrasses are rewarding saltwater fish but require careful stocking order and appropriate tank volume. Not all are reef-safe with small invertebrates.
Hard Rule: Add wrasses last in your saltwater stocking sequence. An established wrasse will aggressively defend its territory against most fish added afterward. This is especially true of six-line wrasses and larger aggressive species.
The Reality of Keeping Wrasses
Wrasses are in constant motion during daylight hours, darting, hunting, and investigating every corner of the tank. A healthy, well-fed wrasse is one of the most entertaining fish in the hobby. But they eat heavily, produce significant waste, and require a varied, protein-rich diet to maintain their health and color long-term.
Is the 15 Reef-Safe Wrasse Types for Saltwater Aquariums Right for You?
Before you add a 15 reef-safe wrasse types for saltwater aquariums to your tank, it’s worth asking whether this species actually fits your setup and your goals. Here’s a quick breakdown to help you decide.
This species is a good fit if:
- You have a large enough tank to manage territories. Cramped conditions amplify aggression.
- You’re comfortable managing aggression through stocking ratios, line of sight breaks, and tank layout.
- You can commit to regular water changes. These fish produce more waste than many smaller species.
- You’re not planning a peaceful community tank. 15 Reef-Safe Wrasse Types for Saltwater Aquariumss need tank mates that can hold their own.
- You enjoy watching active, interactive fish. Cichlids have personality that smaller species simply don’t match.
- You have backup plans. Sometimes a particular fish just doesn’t work out, and you need a way to rehome it.
- You’re feeding a varied, high-quality diet. Color and health depend on nutrition.
If most of those points line up with your setup, the 15 reef-safe wrasse types for saltwater aquariums is worth serious consideration. If several don’t, it’s better to choose a species that matches your tank now rather than trying to make it work.
Avoid If:
- You plan to add new fish after your wrasse is established. Introductions become difficult and stressful
- You keep very small, docile fish or ornamental invertebrates that certain wrasse species will hunt
- You want a low-bioload reef with minimal feeding requirements
- You are new to saltwater fishkeeping. Wrasses are best added once you understand marine water chemistry
How the 15 Reef-Safe Wrasse Types for Saltwater Aquariums Compares to Similar Species
Choosing between similar species is tricky. Here’s how the 15 reef-safe wrasse types for saltwater aquariums stacks up against some common alternatives.
The 15 reef-safe wrasse types for saltwater aquariums occupies a specific niche in the aquarium hobby, and direct comparisons really depend on what you’re looking for. In my experience, the most common question people ask is whether they should choose the 15 reef-safe wrasse types for saltwater aquariums or something similar that’s more widely available. The answer comes down to three things: tank size, water parameters, and what other fish you’re keeping. If your setup matches what the 15 reef-safe wrasse types for saltwater aquariums needs, it’s hard to beat. If not, there are alternatives worth exploring.
Final Thoughts
There are many, many more wrasse species that is right for your aquarium but these are just some of the most popular!
As behavior, tank requirements, and diet can change drastically from wrasse to wrasse, always make sure to research the specific species you plan on getting before bringing it home. Always quarantine your wrasses before adding them to your display since they are likely carrying internal or external parasites!


 Black Phantom Tetra” class=”wp-image-549585″/>


 Buenos Aires Tetra” class=”wp-image-549600″/>